Guest Post: Hand Lettering Basics For Wedding Decorations – FTD Fresh
Hand Lettering Basics For Wedding Decorations
When planning a wedding it can be easy to overlook smaller details, such as hand lettering. However, this beautiful artform should never be disregarded! It is important to make wedding decorations that are elegant and aesthetically pleasing and hand lettering can help you do that. The first thing people see from your wedding are your wedding invitations, so it is crucial that you choose a hand lettering style that will represent you and your partner. Here are some basic hand lettering tips to help make your wedding decorations stunning!
With hand lettering fans in mind, we made a new theme perfect for every bride. Using the font Magnolia Sky, we created a beautiful Weddingmix video shown here with couple Bree and Aaron.
“You miss certain aspects of your wedding while you’re posing for photos, saying hello to family and friends, or talking to vendors, so we loved the idea of not only being able to relive all of our big moments, but to also see what we couldn’t experience firsthand.” -Bree
Getting Started
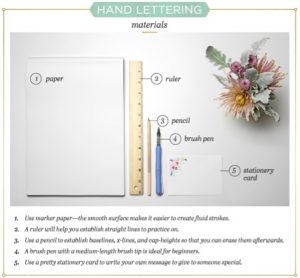
First, you’ll need the basic materials. A piece of paper (preferably marker paper for a smoother finish), a ruler to help you create straight lines, a pencil to guide your first couple of words, a brush pen to create flowy strokes, and your choice of stationary card.
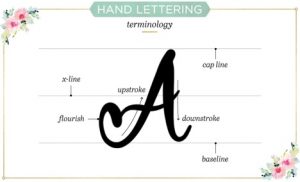
To help you better understand the How to Hand Letter video tutorial we have provided, we are going to go over some basic hand lettering terminology:
- Cap line – This is the top line you will be using to establish the height of all your capital letters.
- X-line – This is the line you will use to establish the height of all your lowercase letters.
- Baseline – This is the very bottom line that the message will sit on.
Flourishes – These are strokes that can be added as decoration to letters within the message to provide flow.
Practice, Practice, Practice!
Now that you know the terms, it’s time to put pen to paper! The key to perfect hand lettering is practice, so don’t get too frustrated when you don’t get it right away. To help the learning process go a little smoother, here are a couple helpful hints:
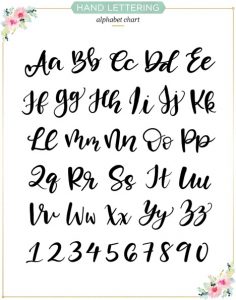
For starters, it is important to establish a cap-line, x-line and baseline, because these are what will be guiding your first couple of letters. When making your strokes, release pressure on upstrokes for thin lines and apply pressure on downstrokes to create thick lines. Once you have mastered the basics, you can add flourishes to your letters to create movement. Check out this hand lettering alphabet chart to see where you can add flourishes and loops!
Have fun playing with loops and flourishes once you’ve mastered the basic letters. You can even stray outside of the lines to create a more lively look. Whichever style you choose, make sure to stay consistent with the rest of your wedding decor.
Where to Include it
Here are a few ways to feature your unique hand lettering style in your wedding decor:
- Menu cards
- Name cards for place settings
- Escort cards
- Welcome signs
- Cocktail menus
- Party favors
Now that you’ve got the basics down, it’s time to start practicing! Just remember to have fun with it and happy hand lettering!
Guest post written by FTD Fresh. Check them out at ftd.com!


Leave a Reply