DIY Photo Backdrops for the Ultimate Wedding Entertainment
How To Make The Ultimate DIY Wedding Photo Backdrop
Guest Post By Emma
One of the best ways to remember your wedding is with a DIY photo backdrop. Together, you and your guests can pose in front of the camera with fun props and goofy expressions to commemorate your wedding in a different way! Alongside your professional photos, these shots look like fun “behind-the-scenes” moments. Plus, they look great on Instagram!
The best part about these photo backdrops is how easy they are to DIY! Following this tutorial from Gifts you can make a beautiful backdrop using your wedding flowers! Just don’t forget to add in your own props, or download and print out a few from the tutorial. You’ll be sure to have some great photo ops when you do.
TUTORIAL: How to Make a Stylish DIY Photobooth with Little to No Cost!

Click photo to read how to create your own photobooth and get a slow-mo video from WeddingMix!
DIY Photo Backdrop Stand
One of the best ways to create photo backdrops is by making your own backdrop stand. This way you can reuse it for different celebrations and move it around easily. We’ll show you how to build a backdrop stand, plus two ways to decorate it! The great thing about a photo backdrop stand is how easy and cheap it is to make! Plus, it’s simple to customize the dimensions to fit your space. All you need is a few materials from your local hardware store.
Materials
We used 1.25 inch PVC pipe throughout.
- 4 – T connectors
- 2 – elbow connectors
- 4 – 1.5 foot long pieces
- 2 – 4 inch long pieces
- 2 – 5 foot long pieces
- 2 – 6.5 foot long pieces
Most hardware stores will cut the PVC pipe for you, so just make sure you give them the proper dimensions listed above. You can also opt to cut the PVC pipe on your own. If you’re going to cut the pipe at home, add a PVC ratchet cutter to your materials list. Follow the tutorial here for cutting instructions.
Directions
Now that you’ve gathered all your materials, it’s time to learn how to make a backdrop stand. Follow these six steps for a photo backdrop stand that will liven up your party! Bonus points if you paint the PVC a fun color beforehand if you’ll see it in the shots.
Step 1 – Begin by building the legs of the stand. Insert a 4 inch pipe in the middle of the T connector and two 1.5 foot pieces on the sides. Repeat for the second leg.
- Optional: Add caps to the legs if you would like.
Step 2 – Add another “T” connector to top of the 4 inch pipes.The middle “T” line should be facing inwards.
Step 3 – Connect the two base pieces by attaching a 5 foot pipe to each of the “T” connectors that are facing inwards.
Step 4 – Add the sides of the photo backdrop by attaching the two 6.5 foot pipes to the upward facing openings on the “T” connectors.
Step 5 – Add the two elbow connectors to the tops of the 6.5 foot pipes.
Step 6 – Connect across by attaching the remaining 5 foot pipe to the elbow connectors.
See how this Bride and Groom used flowers as a photo backdrop during and after their wedding! The natural light helped make this wedding so stunning!
“I didn’t hire a videographer due to cost, but also due to the fact I didn’t want a stranger capturing the moments, I wanted an actual guest of the wedding to capture the moments with WeddingMix.” -Kelly
DIY Photo Backdrop with Fringe
Add some texture to your photo backdrop with colorful fringe triangles. This option is great for any type of party from New Year’s to birthdays. Just choose tissue paper that matches your theme, cut, tape and voila, you have a backdrop!
Materials
- Tissue Paper
- Scissors
- Tape
- Plastic table cloth
- Ruler (optional)
- Pen (optional)
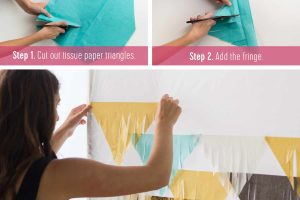
Step 1 – Cut out tissue paper triangles
Once you’ve chosen your colors, cut out triangles from your tissue paper. Cut through multiple layers at a time to make this process faster. You can use a ruler to measure out your triangles, or create triangles in varying sizes.
Step 2 – Add the fringe.
Make vertical cuts in the triangles, stopping about one inch from the top. This will add texture to your backdrop.
Step 3 – Attach to backdrop frame.
Tape the plastic tablecloth onto the backdrop frame. Then tape the tissue paper triangles to the table cloth. Start at the bottom of the backdrop, building up, so that the triangles overlap. Use double sided tape if you want to avoid the tape’s reflection coming through in pictures.
Step 4 – Enjoy!
Practice your posing and get ready to snap some fun shots! Don’t forget the photo booth props!
This lovely couple included the outdoors into their decor! See how they used the trees as anchors for their backdrop and check out their wedding video, filmed by family and friends with WeddingMix!
“My sister’s one regret from her wedding was that she didn’t have a videographer. I really didn’t want to miss out on our vows and everything.”- Naedene
DIY Photo Backdrop with Flowers
Fresh flowers are hard to resist! Give your bridal shower, birthday party or bachelorette party a floral touch with this photo backdrop. Mix in leaves for a pop of green, and make sure you choose long lasting flowers for a backdrop that will last all day.
Materials
- Flowers and leaves
- Fishing line
- Thread
- Scissors
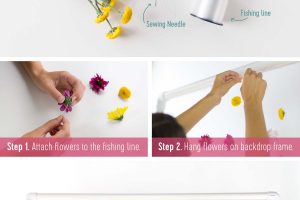
Step 1 – Attach flowers to the fishing line.
Thread the needle with fishing line, tying the line off one one end to ensure that the flowers don’t slip off. Then, thread your needle through the base of the flowers, spacing out the flowers as you see fit. If the flowers are slipping around, you can tie a knot at the spot you’d like the flower to rest before threading the needle through.
Step 2 – Hang flowers on backdrop frame.
Use any basic knot to secure the flower strands to your backdrop. We spaced ours about 4 inches apart for a minimalistic look.
Step 3 – Start posing!
Gather your friends together and take advantage of this fun photo backdrop!
Check out even more ideas for your trendy, DIY photo backdrop!


Leave a Reply